
SITE SELECTION
Take the time to choose the right plant for the right place. Evaluate the planting site for hours of sunlight, soil type, exposure and drainage. Most plants prefer well-drained soil. Understanding the site’s conditions will narrow the choices and make your plant selection easier.
SITE PREPARATION
Do not dig in soil that is excessively wet or dry. Do the “clenched fist” test: If a moist (not wet) soil ball crumbles in you hand it is fine for planting.
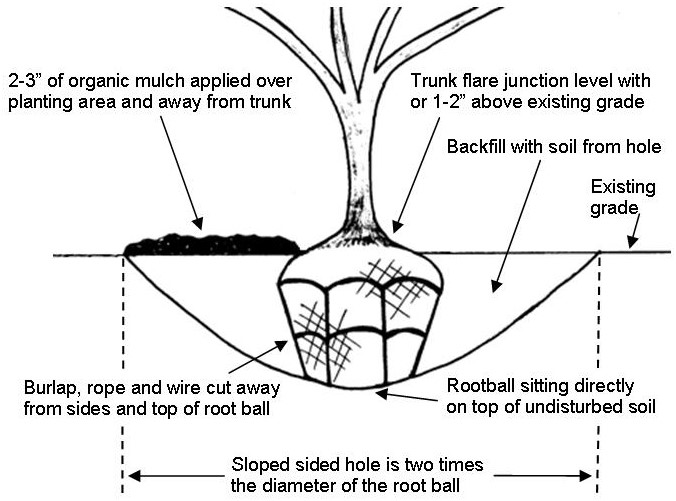
- If you are planting individual specimens loosen the soil only as deep as you need to accommodate the depth of the root ball. It is imperative that the top of the soil ball be at the same depth it was growing or higher, NEVER LOWER! You actually want the root ball to be resting on undisturbed or firm soil. This means no settling later.
- The planting hole should be 2 times the diameter of the root ball with gently sloped sides. The wider, the better.
- Score the sides of the finished hole with a shovel or spade to allow easier root penetration.
SOIL AMENDMENTS
Generally, soils in our area contain a high percentage of clay. We recommend the addition of coarse organic material to improve soil structure and drainage.
- The larger particle size of, Chalet leaf mulch, cotton burr compost and dehydrated cow manure will break up clay soils and facilitate root growth.
- Add 20% organic material to 80% of the existing soil. Mix your soil thoroughly with the organic material and use this blend to backfill the planting holes. Never use more than 25% organic material.
- To aid in root development use Bio-tone Starter Plus or Root & Grow.
PLANTING
Balled & burlapped plants (B&B):
- Roll plant and position in hole. Handle only by the root ball.
- Cut top of wire cage and remove. The bottom of the cage can be left on.
- Cut and remove the ropes around the trunk and ball. Cut and remove burlap from the sides and top of the ball. If the burlap on the sides and bottom is left, it will decay quickly.
- Backfill with soil, slicing down with the shovel all the way around the plant to break up large soil clumps. When finished, gently tamp soil with your foot to exclude air pockets.
Potted plants:
- Remove the plant from the pot. If you have trouble doing this, use a sharp knife to cut the sides of the pot.
- Loosen roots by using your fingers. If needed, use a knife to make vertical slits on the outer ½” of the rootball on four sides.
- Backfill as above.
WATERING
Providing the proper amount of water for your plants is essential to their survival. Your aim is to supplement natural rainfall to provide 1” of water per week at 75 degrees. For every 10 degree increase, add an additional ½”.
- Plants in sandy soil require more water than those in heavy clay soil.
- Some plants, especially evergreens, can easily be over watered when planted in heavy clay soil.
- Plants in full sun require more water than those in shade.
- Mulched plants require less frequent watering than those not mulched.
Hand watering with a hose and a breaker attachment or watering wand is best for your plants. Sprinklers and sprinkler systems are designed for lawns and water only the first few inches of soil. Shrubs and trees require much deeper watering. Leaving a hose running on the ground may flood portions of the root ball while other sections remain dry.
- Hand watering will assure an even soaking of the entire root ball.
- Move the water back and forth across the root zone, soaking the entire area.
- Continue watering until it takes 3-5 seconds to soak into the surface or until you see puddling.
Depending upon conditions, watering frequency will vary between 3-10 day intervals with an average of once per week.
- In well-drained soils, the frequency of watering may increase to every 2-3 days in extreme summer heat.
- Items planted in the summer require more water. For example, hydrangeas may need daily watering in extreme heat.
- Newly planted trees and shrubs require more water than established plants.
- If drought conditions exist even larger, more established plants require watering.
If autumn rainfall is less than 1” per week, continue watering until the ground freezes (typically after Thanksgiving). Fall waterings are especially important for evergreens located in sunny or windswept areas where dehydration is likely to occur.
MULCHING
Mulching is very important. It retains moisture, insulates roots from sudden temperature changes and reduces weeds and soil compaction. Mulched plants adapt more quickly to new environments. Any form of aged mulch may be used.
- Use shredded or chunk bark such as shredded hardwood, shredded cedar or pine bark.
- Spread a 2-3” layer over the planting area, sloping the mulch outwards. Keep mulch 6-8” away from trunk or stems. Good air circulation is a must!
- Maintain a 2-3” layer of mulch year-round by topping off existing mulch with a fresh topcoat each spring. Over time, the mulch will decompose and add nutrients to the soil.
FEEDING
A starter fertilizer such as Root & Grow Plant Starter may be used the plants’ first season. Use at the following rates:
- 1 quart of diluted solution for pots 1-5 gallons
- 2 quarts of diluted solution for pots 7 gallon and larger
- 1 gallon of diluted solution for B&B plants
For the plants’ second season, we suggest a granular fertilizer appropriate for the type of plant material you have. Follow instructions on the package for application rate and timing. Always water thoroughly after applying granular fertilizer.
STAKING
It is necessary to stake a tree only if it is in a windy location, top heavy or begins to lean. The tree should still be able to sway slightly. This movement will encourage stronger rooting. Remove stakes after tree is well-rooted.
TREE WRAPPING
Plastic or paper tree wrap should be used to protect the bark of young trees from animal damage as well as winter injury such as frost cracking. Plastic is best for rabbits and deer. Use tree wrap starting in November and remove by mid-March.
Comments
0 comments
Please sign in to leave a comment.